My Team Guide
Overview
The My Team page is your central hub for viewing and organizing staff members within WFM Planner. It lets you curate one or more named team presets, switch between them, and keep a live membership list that Roster and Planner already use. You can also search the entire staff directory and filter personnel by specific tags.
Key Features
- Named team presets: Keep multiple personal teams (for example “Site Crew” or “Payroll Review”) and switch between them from the page title.
- New team / Save as: Create an empty team to build from scratch, or save a copy of the current list under a new name — without wiping the previous team.
- Default My Team: Every account always has a protected My Team preset that cannot be deleted.
- Auto-save membership: Adding or removing staff updates the active team immediately — there is no separate Save button for membership edits.
- Staff Directory: Browse the complete list of "Staff Members" in the organization.
- Search and Filtering: Quickly find staff members using the search bar or filter the directory using custom tags (e.g., skills, roles, locations).
- Tag Management: View tags assigned to staff members directly on their profile cards.
- Roster Management (Admins & Managers): Users with appropriate permissions can directly access and edit a team member's roster schedule and tags from this page.
Common Tasks
Switching teams
- Navigate to the My Team page.
- Click the team name in the page title (it shows a small dropdown arrow).
- Choose another team from the list.
- The membership grid updates to that team's staff. Roster team view and Planner available-members use the same active list.
Creating a new empty team
- Open the team dropdown from the page title.
- Click New team….
- Enter a unique team name and click Create.
- You switch to an empty team. Your previous team and its members are left unchanged — add the staff you want on the new team.
Use this when you want a different roster without clearing your current team first.
Saving the current list as a new team
- Open the team dropdown from the page title.
- Click Save as….
- Enter a unique team name and click Save.
- The new team becomes active and keeps a copy of the current members. Your previous team is left unchanged.
Notes:
- Team names must be unique (case-insensitive) and are limited in length.
- There is a maximum number of teams per user. When you reach the limit, New team… and Save as… are disabled until you delete a team.
- Membership edits (add/remove) auto-save into the active team. Remove All asks for confirmation because it saves immediately.
Deleting a named team
- Open the team dropdown.
- Click the × next to the team you want to remove (the default My Team has no delete control).
- Confirm in the dialog.
- If you deleted the team you were viewing, the page switches back to My Team.
Adding a Staff Member to Your Team
- Navigate to the My Team page.
- Scroll down to the Staff Members section.
- Locate the staff member you want to add (you can use the search bar or tag filter to find them).
- Click the + (Add) button on their staff card. They will instantly be moved to your active team section.
Membership changes are auto-saved into the team currently selected in the title dropdown.
Removing a Staff Member from Your Team
- In the active team section at the top of the page, locate the staff member.
- Click the - (Remove) button on their staff card. They will be moved back to the general Staff Members list.
- Use Remove All to clear the active team at once; that action also auto-saves after confirmation.
Filtering Staff by Tags
- In the Staff Members section, locate the Filter by Tags input box.
- Click and select one or more tags from the dropdown.
- Only the Staff Members list updates to show people who have all selected tags. Your active team list above is unchanged.
Editing a Team Member's Roster (Managers & Admins)
- Ensure the staff member is added to your active team list.
- Click the Edit button on their staff card.
- The Update Roster Schedule modal will appear.
- From here, you can:
- Manage Tags: Add or remove tags for the staff member using the tag input next to their name.
- Update Active Roster: Modify their current work hours, start time, travel hours, and rotation pattern.
- Schedule Future Rosters: Click Add New Roster to set up a new schedule that begins on a future date.
- Preview Schedule: View a visual preview of the roster rotation at the bottom of the modal.
UI Guide
The My Team Page
The page is split into two main sections: your curated team at the top, and the searchable staff directory below.
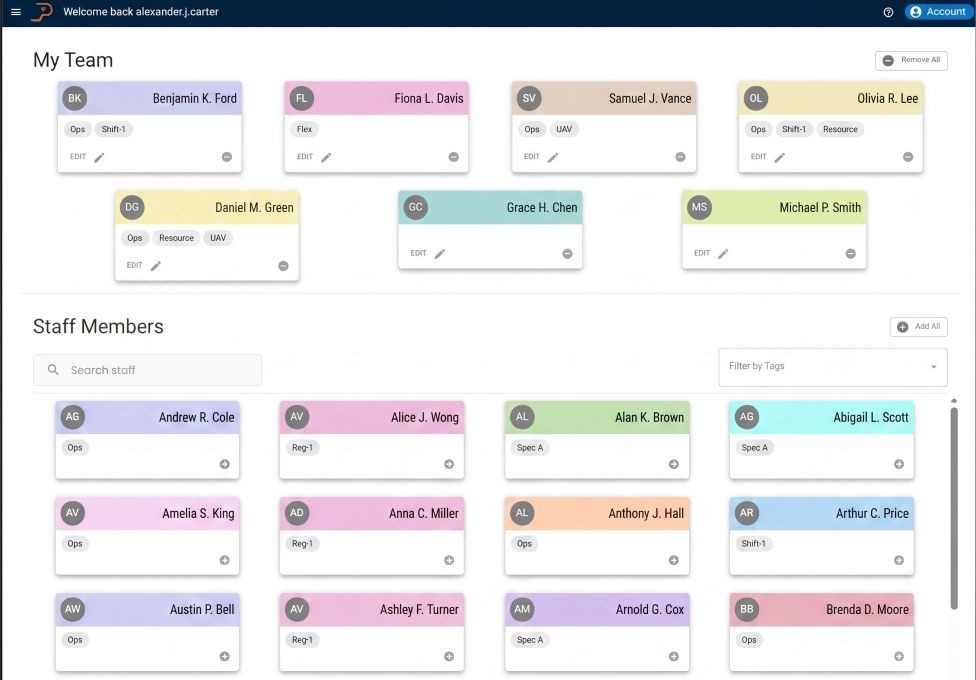
- Team title / switcher: Shows the active team name. Open it to switch teams, create a New team…, Save as…, or delete a named team.
- Active team members: Displays the staff members on the team currently selected.
- Staff Members Section: The general directory of all other staff.
- Search Bar: Type a name to quickly find a specific staff member.
- Tag Filter: Select tags to narrow down the staff list.
Staff Cards
Each staff member is represented by a card that displays their key information.

- Avatar & Name: The staff member's initials and full name.
- Tags: Badges indicating the staff member's assigned tags (e.g., skills, roles). If they have more than three tags, a
+Nindicator will appear. - Edit Button: (Visible to Managers/Admins for users in the active team) Opens the roster editing modal.
- Add/Remove Button: Toggles the staff member between the active team and the Staff Members list.
Update Roster Schedule Modal
This modal allows authorized users to manage a staff member's tags and work schedule.
- Staff Tag Manager: Located at the top next to the staff member's name, allowing you to assign or remove tags.
- Work Hours Tab: Set the regular start time, daily work hours, and travel/transit hours.
- Roster Pattern Tab: Define the start date and the rotation pattern (e.g., 5 days on, 2 days off).
- Active & Future Rosters: The right column displays the currently active roster and any scheduled future rosters.
- Schedule Preview: A visual calendar representation of the configured roster pattern.